이번 포스트에서는 kubernetes+istio 환경에서 돌아가는 웹서비스, 개발자용 툴에 코드 변경없이 Dex(OIDC 구현체)를 사용하여 인증과 검증 방법에대해 기술한다.
인증과 해당 인증에 대한 검증은 Dex와 Istio를 통해 코드의 변경없이 가능하나 인증 성공시 회원가입등을 행위를 위해서는 로직이 필요하다.
사전지식
OIDC란
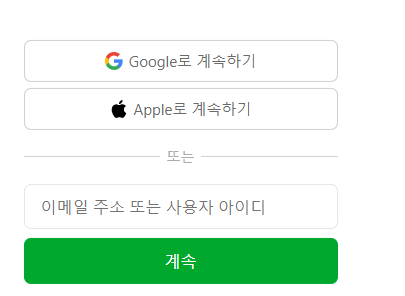
아래 사진처럼 다양한 웹서비스에서 구글, 페이스북, 카카오, 네이버 등으로 로그인을 사용해본적이 있을것이다.
이러한 방식의 로그인은 OAuth2.0(이하 OAuth) 혹은 OIDC(Open ID Connect)를 사용한다.
OIDC는 OAuth에 확장을 통해 구현되었으며 OAuth는 리소스 권한의 인가(Athorization), OIDC는 사용자에대한 인증을 위해 만들어진 프로토콜이다.
- OAuth : Are you allowed to do that
- Access Token으로 인증, 주로 JWT 형식
- 주로 third party API 사용 인가
- 리소스에 대한 행위를 허가 ex) facebook 담벼락(조회, 수정, 삭제, 글올리기), 프로필(조회, 수정) 등
-
구글 OAuth Token 예시
1
2
3
4
5
6
  {
    "access_token" : "ya29.AHES6ZTtm7SuokEB-RGtbBty9IIlNiP9-eNMMQKtXdMP3sfjL1Fc",
    "token_type" : "Bearer",
    "expires_in" : 3600,
    "refresh_token" : "1/HKSmLFXzqP0leUihZp2xUt3-5wkU7Gmu2Os_eBnzw74"
  }
- OIDC : Who are you
- ID Token으로 인증 JWT 토큰
- 주로 SSO를 통한 사용자 인증(로그인)에 사용
-
구글 ID Token 예시
1
2
3
4
5
6
7
8
9
10
11
12
13
14
15
  ID Token : eyJhbGciOiJIUzI1NiIsInR5cCI6IkpXVCJ9.eyJzdWIiOiIxMjM0NTY3ODkwIiwibmFtZSI6IkpvaG4gRG9lIiwiaWF0IjoxNTE2MjM5MDIyfQ.SflKxwRJSMeKKF2QT4fwpMeJf36POk6yJV_adQssw5c
  #아래는 JWT Decode시 보이는 값 예시
  {
    "iss": "https://accounts.google.com",
    "azp": "1234987819200.apps.googleusercontent.com",
    "aud": "1234987819200.apps.googleusercontent.com",
    "sub": "10769150350006150715113082367",
    "at_hash": "HK6E_P6Dh8Y93mRNtsDB1Q",
    "hd": "example.com",
    "email": "jsmith@example.com",
    "email_verified": "true",
    "iat": 1353601026,
    "exp": 1353604926,
    "nonce": "0394852-3190485-2490358"
  }
idP
identity providers의 약자로써 구글, 깃허브, LDAP등 사용자의 디지털 id를 저장, 관리, 인증을 제공하는 제공자
Dex
OIDC의 구현체로써 여러 idP에서(구글, 깃허브, LDAP 등) Connector(해당 idP에 대한 인터페이스)로 연결하여 인증에 대한 처리를 중앙화 해준다.
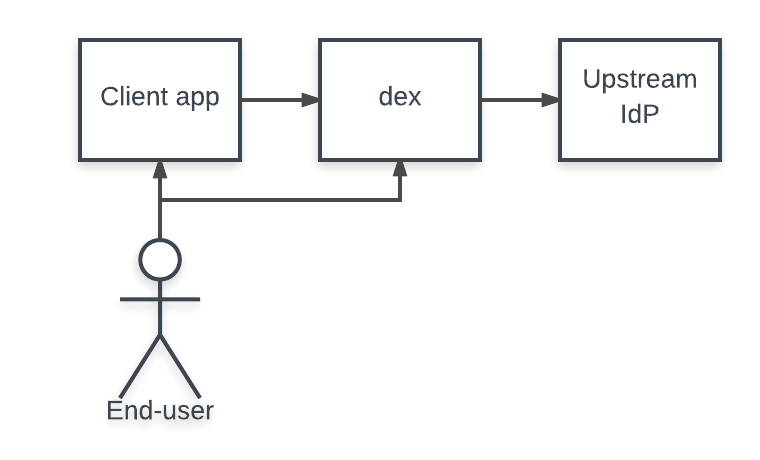
이때 Client App은 우리가 알고있는 Server-Client 구조에서 일반적인 컴퓨터가 아니라 Dex의 입장에서 Client이므로 주로 서버이다.
출처 : dex github
- 사용자가 앱에 인증 요청
- 앱이 Dex Client ID와 Secret ID를 사용해 인증 요청
- Dex는 Connector를 통해 idP에 인증을 대신 수행
사전 준비사항
- Kubernetes
- Istio 설치
- cert-manager 설치
- 유효한 도메인 소유
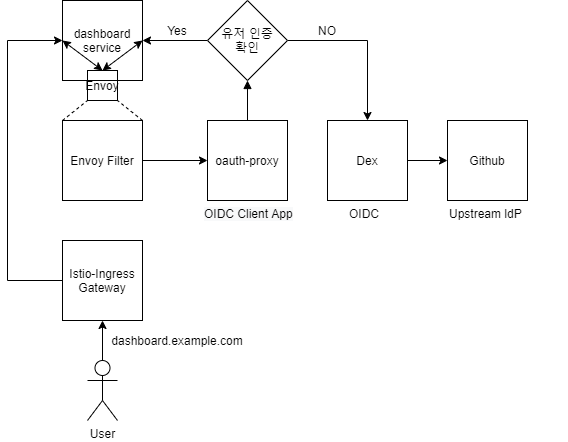
kubernetes-dashboard(dashboard.example.com)에서 동작하고 있으며 깃허브 계정으로 로그인 추가를 위해 dex를(dex.example.com) 도입한다고 가정한다.
예제의 다이어그램은 아래와 같다.
환경설정
kubectl alias k
1
2
3
4
source <(kubectl completion bash) # setup autocomplete in bash into the current shell, bash-completion package should be installed first.
echo "source <(kubectl completion bash)" >> ~/.bashrc # add autocomplete permanently to your bash shell.
alias k=kubectl
complete -F __start_kubectl k
kubectl명령어를 k로 별칭설정
ex) kubectl get pod == k get pod
Github OAuth 앱 등록
Github에서 개인과 organizations 두가지로 OAuth앱을 등록가능하다.
둘중 편한것을 택해 등록해주되 나중에 설정값이 조금다르니 뭐로등록했는지 기억해두자.
-
개인(모든 github유저가 로그인가능) : 등록URL
-
organizations : 해당 그룹에 속한 유저만 로그인가능(팀별로 권한부여도 가능) 생성된 organizations에 Seetings → Developer settings → new OAuth APP
아래와 같은 형식에서 dex.example.com을 자신이 사용할 Dex URL로 변경한다.
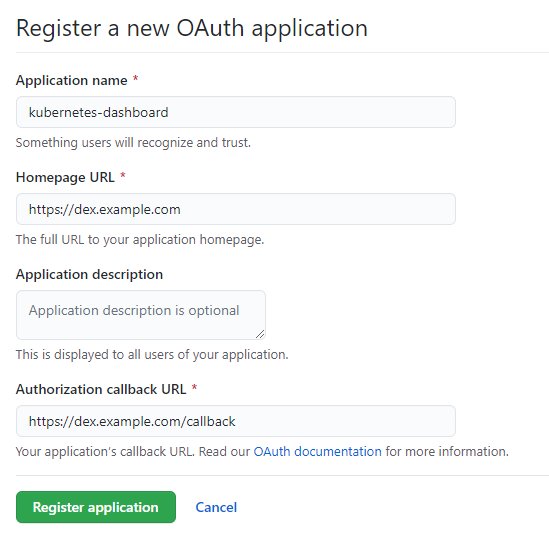
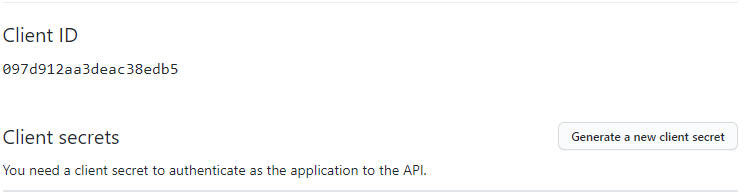
Client ID는 기본적으로 공개되어있으니 Generate a new client secret을 눌러 비밀키도 생성해준뒤 메모장에 기록해둔다.
Git Clone해서 하기
1
git clone https://github.com/lcc3108/istio-dex-kubernetes-dashboard-example.git
git clone 후 폴더를 텍스트 에디터(vscode, eclipse)등으로 열어서 전체 치환을 해준다.
예) dex.example.com과 dashboard.example.com을 각각 dex.lcc3108.com, dashboard.lcc3108.com으로 바꾸는 예시이다. example.com 을 lcc3108.com으로 변경해주면된다.
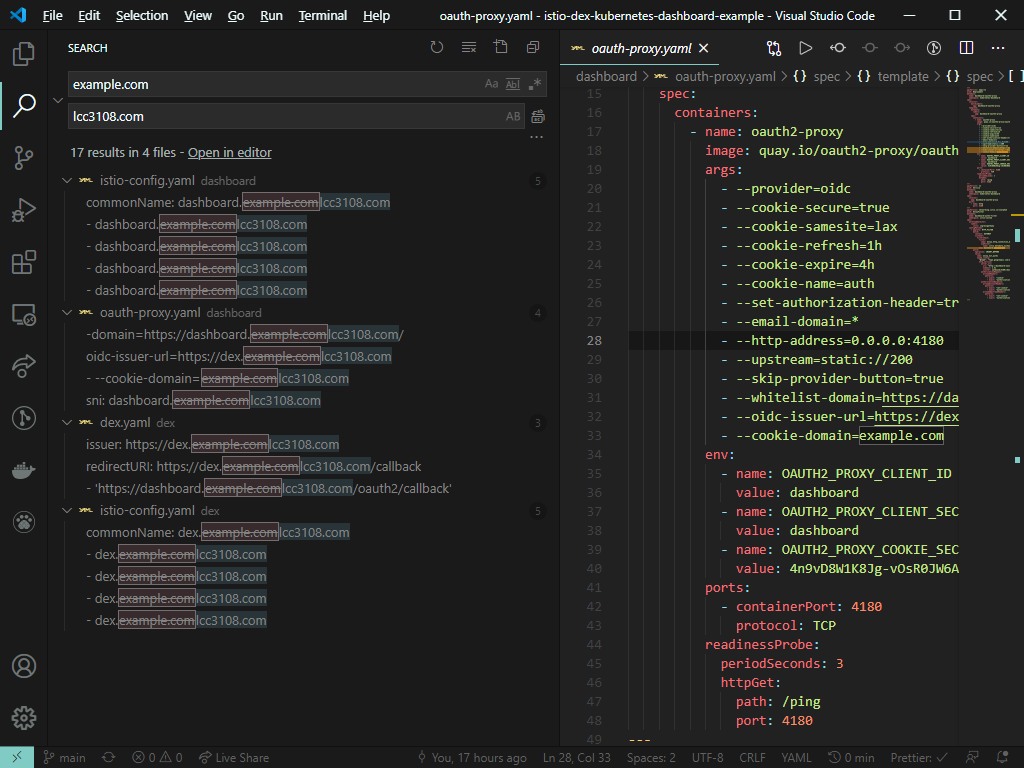
Github Client ID, Secret값도 변경해줘야한다.
dex/dex.yaml 파일에 58번째줄부터 ConfigMap으로써 설정 정보를 담고있다.
77~79번째 줄을 Github OAuth App 생성시 입력했던 정보로 변경한다.
개인 OAuth App을 만들었다면 80~81번째 줄을 삭제한다.
organization을 사용하였다면 81번째 줄에 YOUR_ORGS를 Organizaion 이름으로 변경한다.
그뒤에 아래명령어를 통해 오브젝트를 생성하면된다.
1
2
cd istio-dex-kubernetes-dashboard-example
k apply -f . --recursive
만약에 ConfigMap만 변경한 경우 아래 명령어처럼 Pod을 재시작해야 변경내용이 적용된다.
1
2
#Deployment Pod 재시작 명령어
k rollout restart deployment -n dex dex
CLI로 하기
CLI로 하나씩 따라하길 원하는 사람을 위한 절차이다. 결과는 위의 Git Clone하기와 같다.
kubernetes dashboard 설치
kubernetes-dashboard 2.10버전으로 바로 설치(커스텀 과정을 통해 인증을 없앤 버전)
1
k apply -f https://raw.githubusercontent.com/lcc3108/istio-dex-kubernetes-dashboard-example/main/kubernetes-dashboard.yaml
커스텀 과정(위 명령어 실행과 결과같음)
기본 kubernetes-dashboard 설치
1
2
3
4
5
6
7
8
9
10
11
12
13
14
15
$k apply -f https://raw.githubusercontent.com/kubernetes/dashboard/v2.1.0/aio/deploy/recommended.yaml
namespace/kubernetes-dashboard created
serviceaccount/kubernetes-dashboard created
service/kubernetes-dashboard created
secret/kubernetes-dashboard-certs created
secret/kubernetes-dashboard-csrf created
secret/kubernetes-dashboard-key-holder created
configmap/kubernetes-dashboard-settings created
role.rbac.authorization.k8s.io/kubernetes-dashboard created
clusterrole.rbac.authorization.k8s.io/kubernetes-dashboard created
rolebinding.rbac.authorization.k8s.io/kubernetes-dashboard created
clusterrolebinding.rbac.authorization.k8s.io/kubernetes-dashboard created
deployment.apps/kubernetes-dashboard created
service/dashboard-metrics-scraper created
deployment.apps/dashboard-metrics-scraper created
kubectl context namespace 변경
1
$k config set-context --current --namespace kubernetes-dashboard
kubect context namespace 변경시 명령어뒤에 --namespace를 넣을 필요 없어짐
대시보드 설정 변경
1
k edit deployments.apps kubernetes-dashboard
spec 부분에서 아래 항목 변경
1
2
3
4
5
6
7
8
9
10
11
12
13
14
15
16
17
18
19
#생략
  spec:
	  containers:
    - args:
      - --namespace=kubernetes-dashboard
      - --insecure-bind-address=0.0.0.0 #추가
#생략
      livenessProbe:
        failureThreshold: 3
        httpGet:
          path: /
          port: 9090 #변경
          scheme: HTTP #변경
#생략
      ports:
      - containerPort: 8443
        protocol: TCP
      - containerPort: 9090 #추가
        protocol: TCP #추가
설치 검증
팟 모두 Running 중인지 확인
1
2
3
4
5
6
7
8
9
10
11
12
13
14
15
16
$k get all
NAME                                             READY   STATUS    RESTARTS   AGE
pod/dashboard-metrics-scraper-79c5968bdc-cxzng   1/1     Running   0          4m19s
pod/kubernetes-dashboard-7448ffc97b-t6dm2        1/1     Running   0          4m19s

NAME                                TYPE        CLUSTER-IP       EXTERNAL-IP   PORT(S)    AGE
service/dashboard-metrics-scraper   ClusterIP   10.102.233.166   <none>        8000/TCP   4m19s
service/kubernetes-dashboard        ClusterIP   10.96.254.115    <none>        443/TCP    4m19s

NAME                                        READY   UP-TO-DATE   AVAILABLE   AGE
deployment.apps/dashboard-metrics-scraper   1/1     1            1           4m19s
deployment.apps/kubernetes-dashboard        1/1     1            1           4m19s

NAME                                                   DESIRED   CURRENT   READY   AGE
replicaset.apps/dashboard-metrics-scraper-79c5968bdc   1         1         1       4m19s
replicaset.apps/kubernetes-dashboard-7448ffc97b        1         1         1       4m19s
1
k proxy
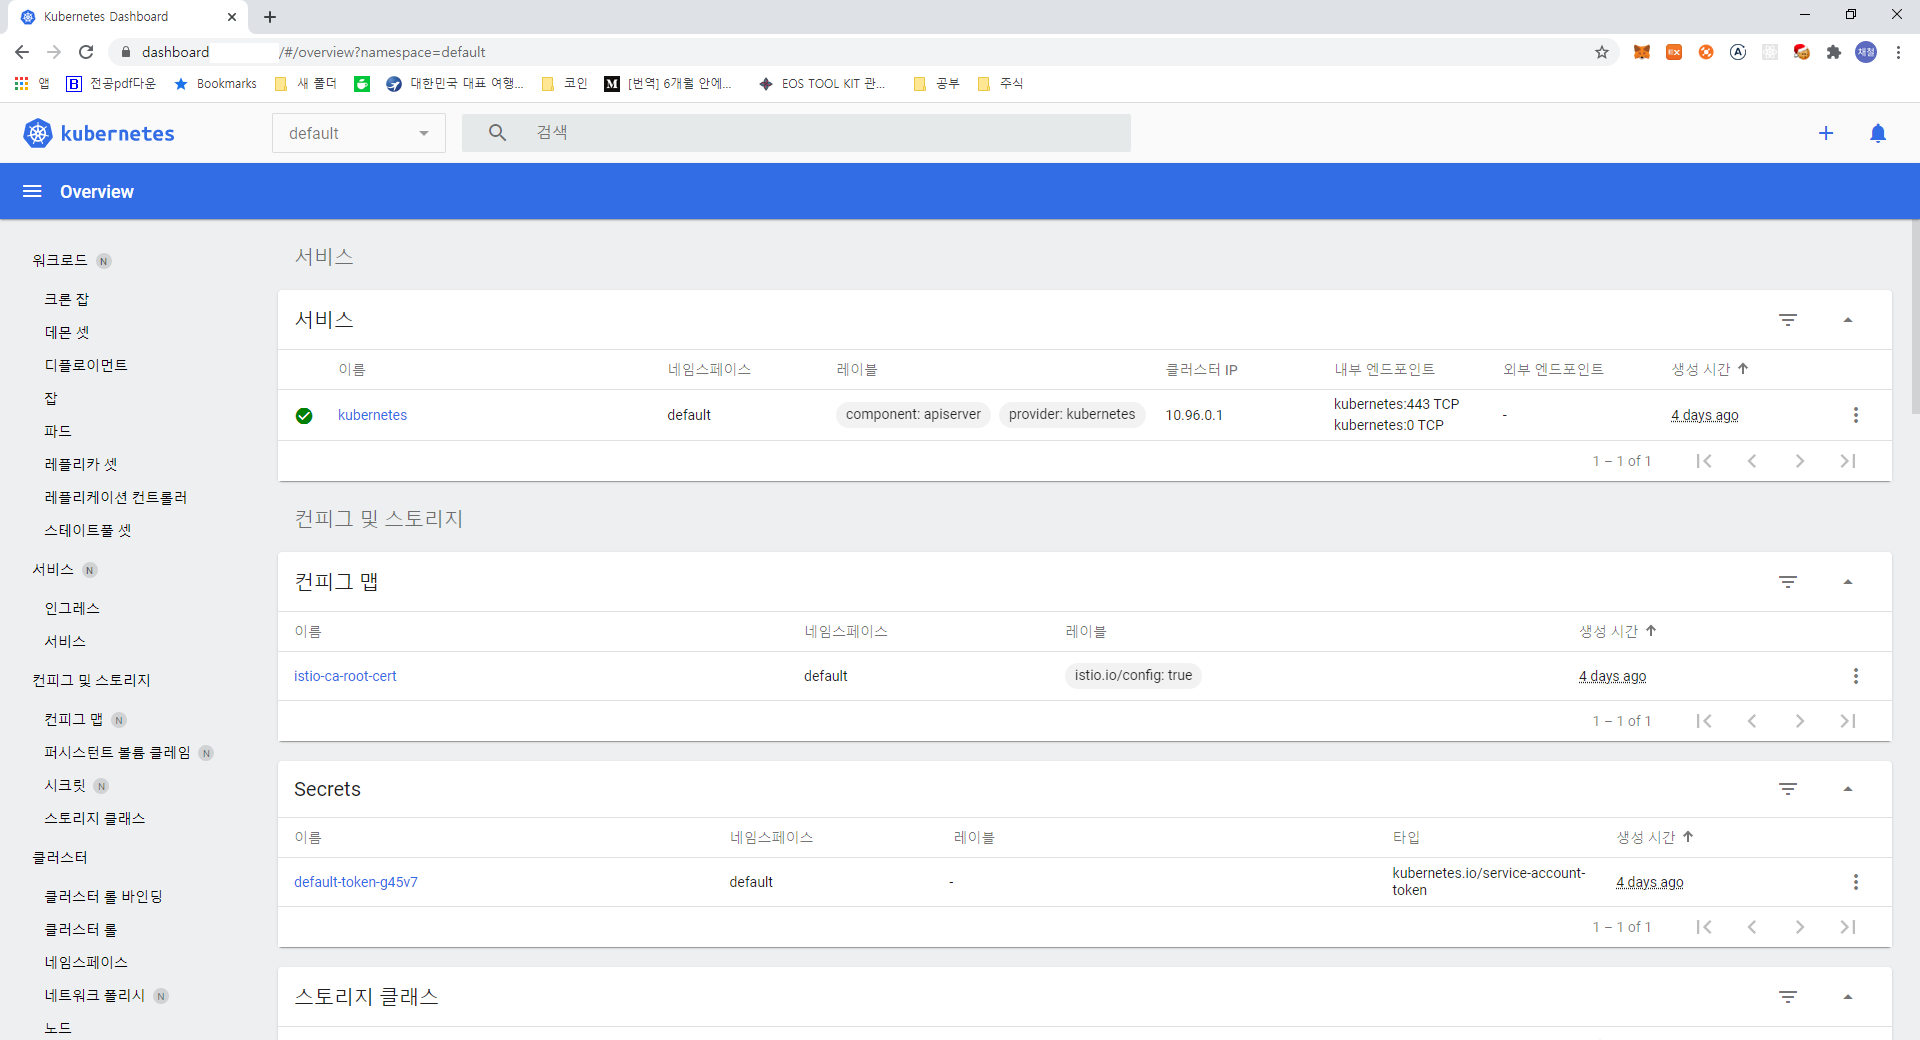
명령어 실행 후 대시보드 URL 접속후 페이지뜨는지 확인 및 쉘에서 실행중인 k proxy 명령어 종료(Ctrl+c)
Istio 설정
인증서 발급
1
2
3
4
5
6
7
8
9
10
11
12
13
14
15
k create -f - <<EOF
apiVersion: cert-manager.io/v1alpha2
kind: Certificate
metadata:
  name: kubernetes-dashboard
  namespace: istio-system
spec:
  secretName: kubernetes-dashboard-tls
  issuerRef:
    name: letsencrypt-prod-istio
    kind: ClusterIssuer
  commonName: dashboard.example.com
  dnsNames:
  - dashboard.example.com
EOF
dashboard.example.com 인증서 생성
Gateway 생성
1
2
3
4
5
6
7
8
9
10
11
12
13
14
15
16
17
18
19
20
21
22
23
24
25
26
27
28
k create -f - <<EOF
kind: Gateway
apiVersion: networking.istio.io/v1alpha3
metadata:
  name: kubernetes-dashboard
  namespace: kubernetes-dashboard
spec:
  servers:
    - hosts:
        - dashboard.example.com
      port:
        name: http
        number: 80
        protocol: HTTP
      tls:
        httpsRedirect: true
    - hosts:
        - dashboard.example.com
      port:
        name: https
        number: 443
        protocol: HTTPS
      tls:
        credentialName: kubernetes-dashboard-tls
        mode: SIMPLE
  selector:
    app: istio-ingressgateway
EOF
인증서적용, http to https redirection 설정
Virtual Service 생성
1
2
3
4
5
6
7
8
9
10
11
12
13
14
15
16
k create -f - <<EOF
kind: VirtualService
apiVersion: networking.istio.io/v1alpha3
metadata:
  name: kubernetes-dashboard
  namespace: kubernetes-dashboard
spec:
  hosts:
  - dashboard.example.com
  http:
  - route:
    - destination:
        host: kubernetes-dashboard.kubernetes-dashboard.svc.cluster.local
  gateways:
  - kubernetes-dashboard
EOF
Istio 설정 검증
Dex 설치
dex 배포
1
k apply -f https://raw.githubusercontent.com/lcc3108/istio-dex-kubernetes-dashboard-example/main/dex/dex.yaml
Github Token 수정
1
2
3
4
5
6
7
8
9
10
11
12
13
14
15
16
17
18
19
20
21
22
23
24
25
26
27
28
29
30
31
32
33
34
$k edit cm -n dex dex
# Please edit the object below. Lines beginning with a '#' will be ignored,
# and an empty file will abort the edit. If an error occurs while saving this file will be
# reopened with the relevant failures.
#
apiVersion: v1
data:
  config.yaml: |
    issuer: https://dex.example.com #URL변경필요
    storage:
      type: kubernetes
      config:
        inCluster: true
    web:
      http: 0.0.0.0:5556
    connectors:
    - type: github
      id: github
      name: GitHub
      config:
        clientID: YOUR_GIT_CLIENT_ID
        clientSecret: YOUR_GIT_SECRET
        redirectURI: https://dex.example.com/callback #URL변경필요
        orgs:
        - name: YOUR_ORGS
    oauth2:
      skipApprovalScreen: true
    staticClients:
    - id: dashboard
      redirectURIs:
      - 'https://dashboard.example.com/oauth2/callback' #URL변경필요
      name: 'k8s-dashboard'
      secret: dashboard
*.example.com 을 자신의 URL로 변경한뒤 clientID와 Secret을 넣어준다.
만약 oranization OAtuh로 생성하였다면 orgs.name 에 값을 넣어준다
개인 OAuth로 생성하였다면 orgs와 orgs.name을 지워준다.
ConfigMap 변경 후 아래 명령어처럼 Pod을 재시작해야 변경내용이 적용된다.
1
2
#Deployment Pod 재시작 명령어
k rollout restart deployment -n dex dex
Istio 설정
인증서 발급
1
2
3
4
5
6
7
8
9
10
11
12
13
14
15
k create -f - <<EOF
apiVersion: cert-manager.io/v1alpha2
kind: Certificate
metadata:
  name: dex
  namespace: istio-system
spec:
  secretName: dex-tls
  issuerRef:
    name: letsencrypt-prod-istio
    kind: ClusterIssuer
  commonName: dex.example.com
  dnsNames:
    - dex.example.com
EOF
dex용 인증서 생성
Gateway 생성
1
2
3
4
5
6
7
8
9
10
11
12
13
14
15
16
17
18
19
20
21
22
23
24
25
26
27
28
k create -f - <<EOF
kind: Gateway
apiVersion: networking.istio.io/v1alpha3
metadata:
  name: dex
  namespace: dex
spec:
  servers:
    - hosts:
        - dex.example.com
      port:
        name: http
        number: 80
        protocol: HTTP
      tls:
        httpsRedirect: true
    - hosts:
        - dex.example.com
      port:
        name: https
        number: 443
        protocol: HTTPS
      tls:
        credentialName: dex-tls
        mode: SIMPLE
  selector:
    app: istio-ingressgateway
EOF
Virtual Service 생성
1
2
3
4
5
6
7
8
9
10
11
12
13
14
15
16
k create -f - <<EOF
kind: VirtualService
apiVersion: networking.istio.io/v1alpha3
metadata:
  name: dex
  namespace: dex
spec:
  hosts:
    - dex.example.com
  http:
    - route:
        - destination:
            host: dex.dex.svc.cluster.local
  gateways:
    - dex
EOF
Istio 설정 검증
dex.example.com/.well-known/openid-configuration 접속해서 페이지 뜨는지 확인
k8s-dashboard 인증 설정
oatuh-proxy 배포
1
2
3
4
5
6
7
8
9
10
11
12
13
14
15
16
17
18
19
20
21
22
23
24
25
26
27
28
29
30
31
32
33
34
35
36
37
38
39
40
41
42
43
44
45
46
47
48
49
50
51
52
53
54
55
56
57
58
59
60
61
62
63
k create -f - <<EOF
---
apiVersion: apps/v1
kind: Deployment
metadata:
  name: dashboard-oauth2-proxy
  namespace: kubernetes-dashboard
spec:
  selector:
    matchLabels:
      app: dashboard-oauth2-proxy
  template:
    metadata:
      labels:
        app: dashboard-oauth2-proxy
    spec:
      containers:
        - name: oauth2-proxy
          image: quay.io/oauth2-proxy/oauth2-proxy:v6.1.1
          args:
            - --provider=oidc
            - --cookie-secure=true
            - --cookie-samesite=lax
            - --cookie-refresh=1h
            - --cookie-expire=4h
            - --cookie-name=auth
            - --set-authorization-header=true
            - --email-domain=*
            - --http-address=0.0.0.0:4180
            - --upstream=static://200
            - --skip-provider-button=true
            - --whitelist-domain=https://dashboard.example.com/ #URL변경필요
            - --oidc-issuer-url=https://dex.example.com #URL변경필요
            - --cookie-domain=example.com
          env:
            - name: OAUTH2_PROXY_CLIENT_ID
              value: dashboard
            - name: OAUTH2_PROXY_CLIENT_SECRET
              value: dashboard
            - name: OAUTH2_PROXY_COOKIE_SECRET
              value: 4n9vD8W1K8Jg-vOsR0JW6A==
          ports:
            - containerPort: 4180
              protocol: TCP
          readinessProbe:
            periodSeconds: 3
            httpGet:
              path: /ping
              port: 4180
---
apiVersion: v1
kind: Service
metadata:
  name: dashboard-oauth2-proxy
  namespace: kubernetes-dashboard
spec:
  selector:
    app: dashboard-oauth2-proxy
  ports:
    - name: http
      port: 4180
---
EOF
EnvoyFilter추가
1
2
3
4
5
6
7
8
9
10
11
12
13
14
15
16
17
18
19
20
21
22
23
24
25
26
27
28
29
30
31
32
33
34
35
36
37
38
39
40
41
42
43
44
45
46
47
48
k create -f - <<EOF
---
apiVersion: networking.istio.io/v1alpha3
kind: EnvoyFilter
metadata:
  name: dashboard-authn-filter
  namespace: istio-system
spec:
  workloadSelector:
    labels:
      istio: ingressgateway
  configPatches:
    - applyTo: HTTP_FILTER
      match:
        context: GATEWAY
        listener:
          filterChain:
            filter:
              name: envoy.http_connection_manager
              subFilter:
                name: istio.metadata_exchange
            sni: dashboard.example.com
      patch:
        operation: INSERT_BEFORE
        value:
          name: envoy.ext_authz
          typed_config:
            "@type": "type.googleapis.com/envoy.config.filter.http.ext_authz.v2.ExtAuthz"
            http_service:
              server_uri:
                uri: "http://dashboard-oauth2-proxy.kubernetes-dashboard.svc.cluster.local/"
                timeout: 1.5s
                cluster: outbound|4180||dashboard-oauth2-proxy.kubernetes-dashboard.svc.cluster.local
              authorizationRequest:
                allowedHeaders:
                  patterns:
                    - exact: "cookie"
                    - exact: "authorization"
              authorizationResponse:
                allowedClientHeaders:
                  patterns:
                    - exact: "set-cookie"
                    - exact: "authorization"
                allowedUpstreamHeaders:
                  patterns:
                    - exact: "set-cookie"
                    - exact: "authorization"
EOF
- match : GATEWAY로 들어오는 dashboard.example.com 트래픽에대해 적용
- patch : 해당 URL에 접속하기전에 dashboard-oauth2-proxy에 인증되었는지 확인 요청을 보낸다. 인증돼있으면 200을 리턴해주며 트래픽이 dashboard로 가게 해준다. 200이외의 응답이 오면 로그인페이지로 간다.
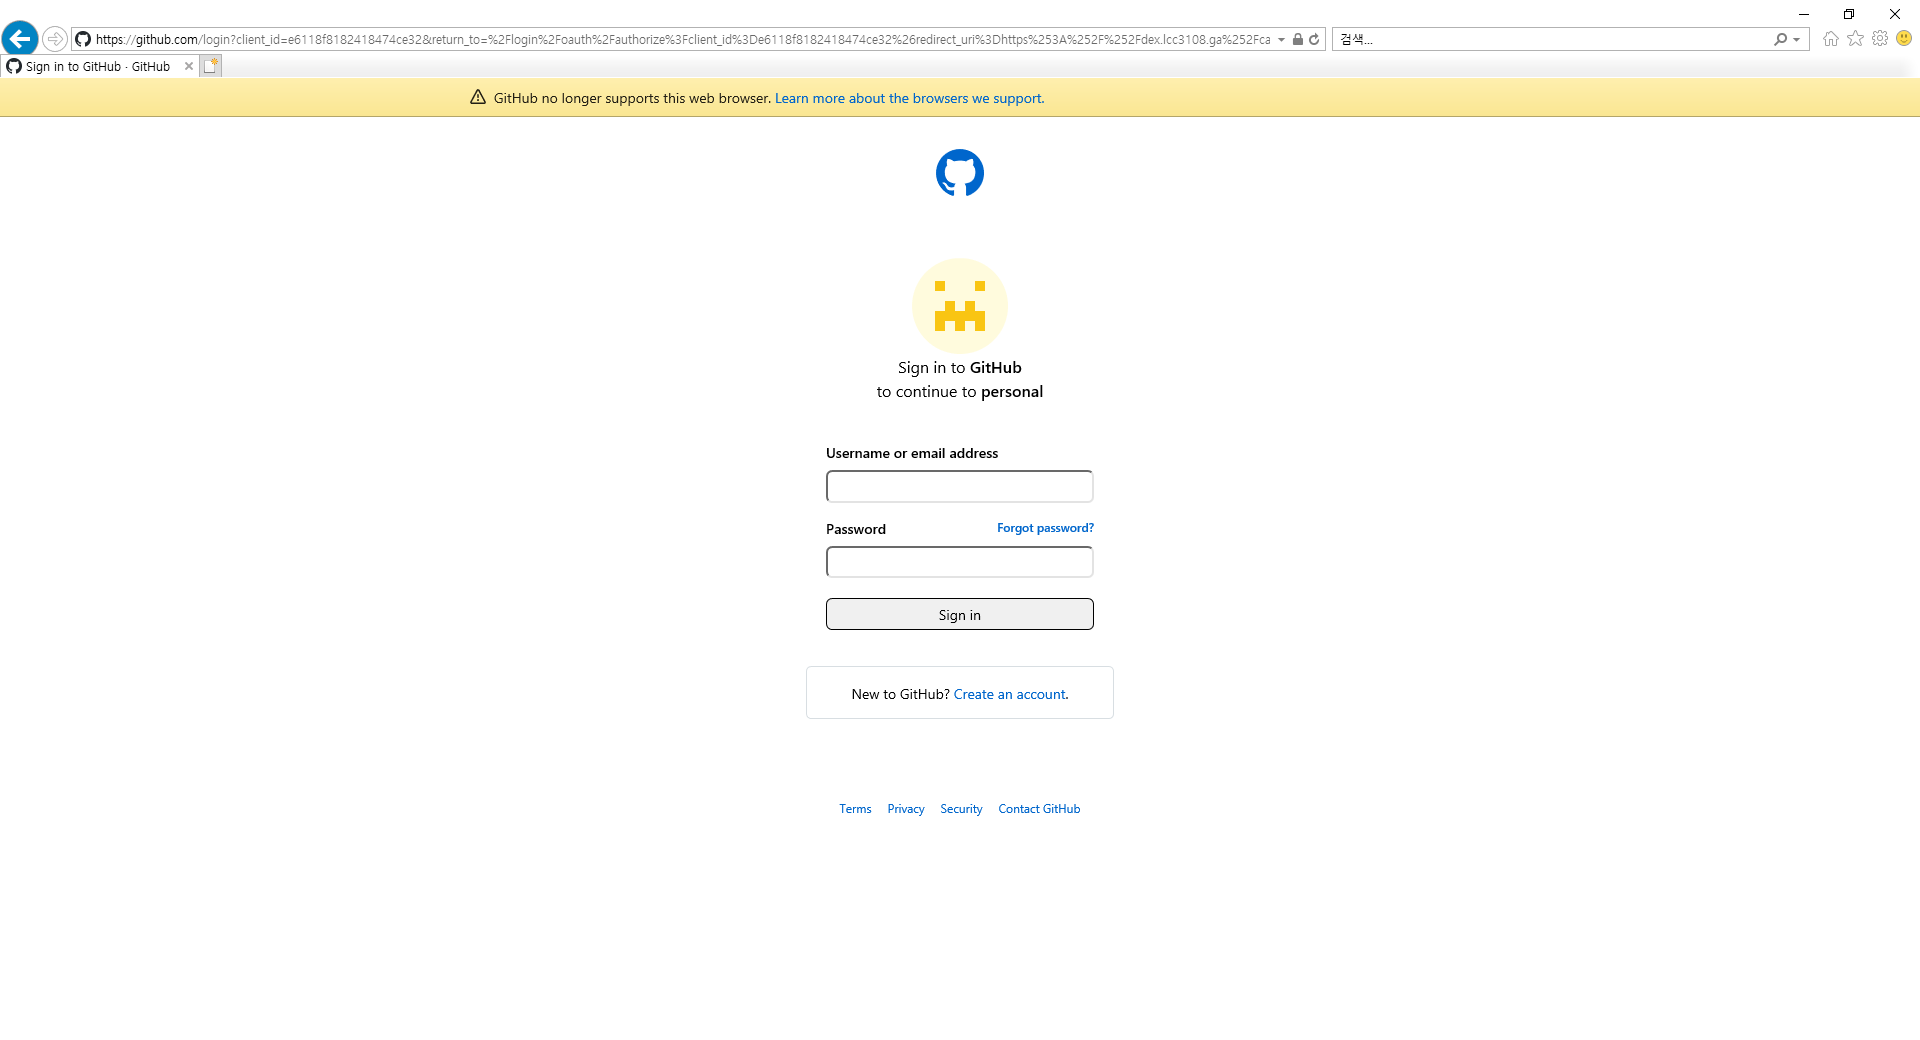
검증
dashboard.example.com 접속시 아래와 같이 로그인 화면이 뜨면 성공